

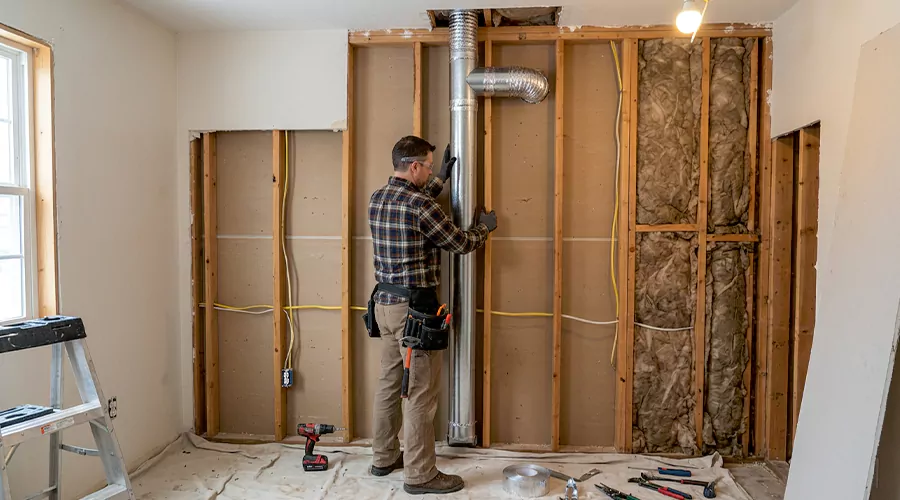
Running ductwork through walls requires planning a suitable duct route, checking the building's framing, sizing the air passage, and installing a dedicated duct or approved chase without compromising structural or fire-safety requirements. Custom HVAC ductwork can provide a suitable solution when standard duct sizes or existing wall spaces do not accommodate the required airflow. The ducts must be mechanically supported, sealed at their connections, and insulated where required. A qualified HVAC contractor should verify the design and finished airflow before the wall is closed.
Wall ductwork allows conditioned air to move between floors or reach rooms where attic and basement routes are unavailable. These installations are common in multistory homes, remodels, and buildings receiving central heating or air conditioning for the first time. Supply and return ducts may travel vertically through dedicated wall chases or pass through approved wall penetrations to connect with other duct sections.
The main challenge is that walls contain structural framing, electrical wiring, plumbing, and insulation. An ordinary stud cavity is often too narrow for a conventional insulated HVAC duct. Trying to force a duct through insufficient space can restrict airflow or damage the surrounding construction.
A successful installation balances the space required by the duct with the building's structural and mechanical requirements. In some cases, a properly constructed chase or soffit is more practical than routing ducts inside an existing wall. The contractor should evaluate these options before cutting openings.
Can You Install HVAC Ductwork Inside a Wall?
Yes. HVAC ducts can run inside appropriately designed wall spaces or dedicated vertical chases when the materials and installation meet applicable building requirements. The route must provide sufficient space for the duct's intended size and allow suitable connections at both ends.
A common installation involves a rigid metal duct running vertically through an interior chase. The duct may connect a basement supply trunk to upper-floor branches. Depending on the home's layout, the chase may be enclosed within a new wall or a specially constructed projection.
Installing ducts inside an ordinary wall cavity is more difficult. Standard residential framing may not provide enough depth for the required duct and insulation. The contractor should not reduce the duct to an unsuitable size solely to fit the available space.
The installation must also distinguish between a physical duct located inside a wall and using the wall cavity itself as an air passage. These arrangements have different performance and code implications.
Can Wall Cavities Be Used as HVAC Ducts?
Ordinary wall cavities should not automatically be treated as HVAC ducts. The U.S. Department of Energy recommends dedicated, sealed return pathways rather than relying on framing cavities because gaps can allow air to communicate with surrounding construction spaces.
The 2024 International Residential Code permits certain stud and floor-joist cavities to serve as return-air plenums under specific conditions. However, it prohibits their use as supply-air plenums and places restrictions on fire-rated construction, exterior wall cavities, and connections between floors. Building cavities used as permitted return plenums must also be sealed appropriately.
This distinction is important during renovations. A contractor should not open a wall cavity and connect it to a supply trunk simply because the space appears empty. A purpose-built metal or other approved duct provides a more predictable airflow passage.
Local codes may impose different or additional requirements. A qualified contractor should verify the rules adopted by the jurisdiction before proposing any cavity-based arrangement.
What Types of Ductwork Can Run Through Walls?
Wall installations commonly use rigid sheet metal ducts because their dimensions remain stable and they can be fabricated to fit designed chases. Rectangular ducts may provide useful capacity when wall depth is limited but sufficient width is available. Round metal ducts can also work where the chase dimensions permit them.
Flexible ductwork is less suitable for many narrow wall applications because its insulation and outer jacket increase its overall diameter. Compressing the material to fit between studs can reduce its airflow capacity. It may also be difficult to provide the required supports inside a narrow concealed space.
| Duct Material | Typical Wall Application | Main Consideration |
|---|---|---|
| Rectangular sheet metal | Vertical supply and return chases | Can be sized for available chase dimensions |
| Round sheet metal | Suitable vertical passages | Requires sufficient clearance |
| Insulated flexible duct | Selected approved large chases | Must not be compressed or sharply bent |
| Approved rigid duct products | Specialized installations | Must meet code and product requirements |
| Dedicated return duct | Return pathway between floors | Needs suitable airflow capacity and sealing |
| Metal elbows and transitions | Direction changes at wall connections | Must avoid excessive airflow resistance |
The final selection should follow the airflow design and actual construction. A shallow rectangular metal duct may fit a planned chase more effectively than an insulated round duct. However, its dimensions must still provide the required capacity.
Why Is Running Ductwork Through Walls Difficult?
Walls perform several functions beyond dividing rooms. Many walls support floors or roofs, contain building services, and provide fire or sound separation. Installing ducts can affect these functions if the route is not planned carefully.
Structural Studs and Framing
Load-bearing studs and other structural members should not be cut or altered without an approved design. Large duct openings can remove more framing material than ordinary electrical or plumbing penetrations. A new chase may be necessary when the existing structure cannot accommodate the required passage.
A contractor should identify which walls carry structural loads before making openings. This may require building plans or professional structural evaluation. Assuming that a wall is non-load-bearing based only on its location can lead to unsafe modifications.
Electrical Wiring
Wall cavities frequently contain electrical wiring and junction boxes. Cutting an opening without locating these components can create shock and fire hazards. Duct installation should not interfere with required electrical clearances or access.
Electrical wiring should not simply be pushed against the duct to make room. When relocation is necessary, qualified electrical work may be required. The HVAC route should be coordinated with other building systems before construction begins.
Plumbing and Drainage Pipes
Water supply lines, drains, and plumbing vents can occupy the same walls considered for ductwork. A large air passage may not fit around these components. Moving plumbing can create additional cost and requires appropriate design and approvals.
Water leaks near duct insulation can also cause moisture problems. The contractor should identify damaged or leaking plumbing before closing a new chase.
Fire-Rated Construction
Certain walls separate occupancies, garages, or other building areas under fire-safety requirements. Penetrating these assemblies can require approved firestopping or listed duct penetration details. Some applications may also need dampers or other protective components.
Ordinary sealant should not be assumed suitable for every rated assembly. The contractor must follow the requirements applicable to the specific wall and duct configuration.
Available Space
A conventional supply or return duct may require more room than a standard framed wall provides. The duct's insulation and connections also occupy space. Designing the route around an undersized cavity can lead to restrictions that affect HVAC performance.
A dedicated chase or soffit may be preferable. The additional construction can preserve the required duct dimensions without damaging existing framing.
How Do You Size Ductwork for a Wall?
The duct's internal dimensions should be based on the airflow it must carry and the pressure available from the HVAC equipment. Its outside dimensions must also fit the proposed chase, including necessary insulation and connection clearance. Both requirements need to be considered during design.
ACCA Manual D provides recognized methods for residential duct sizing. The design accounts for airflow, duct length, fittings, and resistance. Rectangular ducts can be selected using suitable dimensions while still accounting for their pressure losses.
A narrow rectangular duct is not automatically equivalent to a round duct that has a similar outside width. Its cross-sectional area and friction characteristics affect performance. The contractor should calculate the appropriate dimensions rather than use a rough visual comparison.
When the required duct cannot fit the planned wall, the better solution is to change the route or chase. Reducing the duct below its designed capacity can cause persistent airflow problems.
What Tools and Materials Are Needed?
The required tools depend on the wall construction and duct material. A professional installation may involve opening drywall or plaster, fabricating metal ducts, and constructing a dedicated chase. Suitable fastening and sealing products are necessary for the HVAC connections.
| Material or Tool | Purpose |
|---|---|
| Appropriately sized rigid duct | Forms the air passage |
| Approved metal elbows and transitions | Connects wall ducts to trunks or outlets |
| Duct supports and brackets | Holds the duct securely |
| HVAC mastic or listed closure materials | Seals connections and seams |
| Register boots and grille boxes | Connects ducts to rooms |
| Suitable insulation | Protects ducts where required |
| Approved fireblocking or firestopping materials | Restores required building protection |
| Wall framing materials | Constructs a suitable chase |
| Drywall or other approved finish | Encloses the completed passage |
| Inspection and measuring equipment | Verifies routing and dimensions |
| Airflow and leakage testing equipment | Checks completed performance |
The materials must be suitable for the installation and applicable local rules. A properly designed wall duct should not rely on improvised fittings or loose building cavities.
How to Run Ductwork Through Walls Step by Step?
Running ducts through walls is a combined HVAC and building construction task. The steps below describe the normal professional process for a dedicated duct or wall chase. The work should be designed and inspected before finished surfaces conceal the installation.
Step 1. Determine Why the Wall Duct Is Needed
Identify the rooms and floors the new duct will serve. A vertical passage may be required to carry conditioned air from basement equipment to upper-level supply branches. A return duct may also be needed to provide an appropriate pathway back to the blower.
The contractor should establish whether the wall duct is part of a new system or a modification to an existing distribution network. This distinction affects sizing and connection locations. A new branch should not be added without considering its effect on the other rooms.
Step 2. Calculate Heating and Cooling Loads
Determine the room-by-room heating and cooling requirements. ACCA Manual J provides a recognized approach to calculating residential loads. These calculations help determine how much air should be delivered through the new wall duct.
The duct size should be based on the required airflow and available system pressure. A contractor should not select the smallest duct that can physically fit into the wall. Doing so may create poor performance or excessive air noise.
Step 3. Inspect the Proposed Wall
Examine the wall's construction and determine whether it is load-bearing. Identify the likely locations of studs, plumbing, wiring, and other building systems. Where concealed conditions cannot be established reliably, appropriate inspection openings may be necessary.
A contractor should also determine whether the wall is part of a required fire-resistance-rated assembly. The installation method must preserve any applicable fire-safety requirements.
Step 4. Evaluate Alternative Routes
Before cutting into the wall, compare other available pathways. A closet, service chase, or new soffit may provide enough room for a properly sized duct with less structural disruption. An attic or basement route may also reduce the amount of vertical wall work needed.
The shortest route is not always the easiest to construct. A slightly longer path through an accessible chase may provide better installation access and preserve existing framing. The contractor should compare airflow resistance and construction impact together.
Step 5. Select the Duct Type and Dimensions
Choose a duct material suitable for the intended airflow and route. Rigid metal is commonly used for vertical chases because it can be fabricated into stable rectangular or round sections. Its dimensions should allow room for appropriate fittings and any required insulation.
Avoid compressing flexible ductwork inside a narrow stud cavity. Flexible material performs poorly when its inner liner is squeezed or sharply bent. The selected passage should maintain its intended shape throughout the wall.
Step 6. Develop the Chase or Opening Design
Prepare a layout showing the full duct route, connection points, and proposed wall openings. Identify where the duct will enter and exit the wall and how the surrounding construction will be restored. The design should also account for required supports.
If a chase must pass through floors, the contractor should plan the openings and fireblocking details. Structural changes require appropriate review before construction begins.
Step 7. Check Permits and Older Building Materials
Verify whether the work requires mechanical or building permits. Opening rated walls or changing structural framing can trigger additional requirements. Local authorities should be consulted when the project involves unusual construction conditions.
Older buildings may contain lead-based paint or asbestos-containing materials. Applicable EPA renovation precautions should be followed before disturbing suspect materials. Ordinary demolition should not proceed through potentially hazardous insulation without qualified assessment.
Step 8. Shut Down the HVAC Equipment
Turn off the affected heating and cooling system before opening existing ducts. Qualified personnel should follow electrical isolation procedures when work involves equipment cabinets or nearby energized components. The blower should not operate while major duct openings are exposed.
This helps prevent loose construction debris from entering the distribution network. The contractor should protect the existing duct system during wall demolition.
Step 9. Open the Wall in the Approved Locations
Create the planned access openings using methods appropriate for the wall material. Check for concealed wiring or plumbing before cutting. The opening should provide the clearance required by the duct and its fittings.
Do not cut studs or other framing members beyond what the approved design permits. If unexpected structural or utility components are discovered, revise the route before continuing. The opening should not simply be enlarged without evaluating the consequences.
Step 10. Construct a Dedicated Chase When Necessary
Where an existing wall cavity cannot accommodate the duct, construct the approved chase. Its dimensions should provide enough space for the duct and any required insulation. The chase may form part of a new wall projection or connect to a planned soffit.
The U.S. Department of Energy describes dropped-ceiling and chase arrangements that place ducts within conditioned space. Such installations can reduce exposure to unconditioned attics when properly designed. Their effectiveness depends on maintaining suitable air barriers around the chase.
Step 11. Install the Main Wall Duct
Position the rigid duct inside the designated route. Align the sections and connect them using appropriate fittings. Mechanical supports should hold the passage independently rather than allowing its weight to pull against the upper and lower connections.
The duct should not press against electrical wiring or plumbing. Any necessary clearances should be maintained. The contractor should inspect the placement before finalizing the connections.
Step 12. Secure the Duct Sections
Mechanically fasten the duct joints according to the material and fitting requirements. A long vertical section should have suitable supports so its weight is carried safely. Connection collars should not act as the only structural support.
Loose joints can develop air leakage or vibration during blower operation. The installer should check that the duct remains properly aligned and does not move excessively within the chase.
Step 13. Install Elbows and Transitions
Connect the vertical passage to the basement trunk, attic branches, or room register boots. Use properly sized elbows and transitions where the duct changes direction. Avoid abrupt reductions that can increase airflow resistance.
A wall duct often requires a direction change at the floor or ceiling. The fitting design is important because pressure loss can accumulate through several bends. The contractor should use the planned fittings rather than improvising during installation.
Step 14. Seal All Duct Connections
Apply suitable HVAC mastic or approved closure products to the appropriate joints and seams. ENERGY STAR recommends sealing ducts with appropriate mastic or metal-backed materials rather than ordinary cloth-backed tape. A concealed wall duct should be checked carefully because leaks become harder to reach after the wall is closed.
Return duct leakage deserves particular attention. A poorly sealed return can draw air from surrounding building cavities. The installation should maintain a dedicated, airtight passage to the equipment.
Step 15. Install Insulation Where Required
Insulation requirements depend on whether the duct is inside conditioned space or passes through an unconditioned area. A wall containing an exterior thermal boundary may need special attention to condensation and insulation continuity. The duct should not displace required wall insulation without an approved solution.
Where insulation is necessary, it should cover the duct properly without being compressed into an unsuitable space. The contractor should also restore the surrounding wall's air and thermal barriers. These details help reduce unwanted temperature and moisture movement.
Step 16. Restore Fireblocking and Rated Assemblies
Duct penetrations can create concealed paths for smoke and fire movement if surrounding construction is not restored properly. Required fireblocking must be installed at appropriate locations. Fire-rated walls or floors may need approved penetration details or listed systems.
The precise requirement depends on the building and the duct arrangement. Ordinary expanding foam should not be assumed acceptable for every fire-rated penetration. The contractor should follow the applicable approved detail.
Step 17. Install the Register or Return Grille
Where the duct terminates in a room, attach a suitable register boot or grille box. The outlet should be positioned according to the airflow design. Secure the fitting to appropriate supports so it does not move when the grille is installed.
The visible cover should provide adequate free area and an appropriate airflow pattern. A decorative grille that restricts the opening can reduce performance even when the concealed duct is correctly sized.
Step 18. Inspect the Duct Before Closing the Wall
Check the full accessible duct length for loose fasteners, incomplete seals, missing supports, and damaged insulation. Confirm that the passage remains clear of obstructions. Any necessary inspection or testing should occur before the wall is enclosed.
A leak or unsupported fitting discovered after drywall installation can require reopening the wall. A pre-closure inspection reduces that risk.
Step 19. Perform Leakage and Airflow Tests
A qualified contractor should evaluate the duct network for leakage and appropriate airflow. Testing can identify defects that are difficult to see once the ducts are enclosed. System static pressure may also need evaluation if the project changes the main supply or return network.
When the new duct connects different floors, the contractor should confirm that the system distributes air according to the intended design. An oversized or undersized connection can affect more than one room.
Step 20. Close and Finish the Wall
After the ductwork passes the necessary checks, restore the wall using the approved construction details. Required fireblocking, air barriers, insulation, and finishes should be completed. Access to components that require future service must remain available.
In older homes, plaster or decorative finishes may need specialist restoration. The contractor should identify this work before the project begins so the homeowner understands the expected final appearance.
How Do You Run Ductwork Through a Load-Bearing Wall?
Routing ductwork through a load-bearing wall requires additional structural planning. The wall supports loads from other parts of the building, and removing studs or large sections can weaken it. A contractor should not cut a wide duct opening without approved structural guidance.
A dedicated chase adjacent to the existing wall may be more practical than altering the load-bearing studs. Where structural modification is unavoidable, a qualified designer or engineer may need to specify the required reinforcement. Applicable permits and inspections should be completed.
The HVAC design should adapt to the safe construction method. Duct size should not be reduced below the airflow requirement simply to avoid structural work.
Can You Run Flexible Ductwork Through Walls?
Flexible ductwork may be permitted in certain suitably sized chases, but it is not appropriate for many ordinary wall cavities. The insulation and protective jacket increase its outside diameter, and the inner liner must not be compressed. Long vertical flex ducts also require manufacturer-approved supports.
Department of Energy guidance generally recommends supporting vertical flexible duct sections at intervals no greater than six feet. However, product-specific instructions and local requirements may be more restrictive. The duct should also remain protected from mechanical damage during wall construction.
Rigid metal is often a more practical choice for a confined vertical passage. The final decision should be based on the required airflow and approved installation.
Can You Run Ductwork Through Exterior Walls?
A duct can pass through an exterior wall when the design and applicable codes permit it, but such penetrations require careful attention to weather protection and the building's thermal boundary. The duct and surrounding opening must be sealed appropriately. Insulation and vapor-control details also matter.
Ordinary exterior wall stud cavities should not be used as return-air plenums under the 2024 IRC provisions described for building-cavity plenums. HVAC air distribution should use approved dedicated passages where required. Cutting into a structural or fire-rated exterior wall may also trigger additional review.
A contractor should evaluate whether an interior chase provides a better route. Exterior wall modifications can introduce water intrusion and condensation risks when not designed properly.
How Do You Run Ductwork Between Floors?
Vertical duct chases often connect a basement furnace or air handler to upper floors. The route may pass through closets, utility spaces, or purpose-built shafts. The installation must account for floor framing and any fireblocking or fire-rated separation required between levels.
The duct should be supported so its weight is not carried solely by one lower fitting. Penetrations should be sealed and restored according to the applicable construction details. Branches can then connect to suitable registers on the upper floors.
A contractor should check the airflow needs of both floors. Long vertical runs and multiple fittings increase resistance, which must be reflected in the duct sizing.
How Much Does It Cost to Run HVAC Ductwork Through Walls?
The cost depends on the length and size of the duct and the amount of wall construction required. Installing a short duct through an accessible unfinished chase can involve much less work than routing a new main supply passage through two finished floors. The price also changes when structural review, fire-rated construction, or decorative restoration is involved.
A complete quote should distinguish duct materials and installation labor from demolition and finish repairs. Custom metal duct fabrication may be necessary when the chase has unusual dimensions. The contractor should also include appropriate sealing and performance verification.
Homeowners should request an inspection before relying on a generic price per linear foot. In wall installations, construction access and restoration can account for a substantial part of the total cost.
What Are the Alternatives to Running Ductwork Inside Walls?
When a wall cannot accommodate the required duct size, other routes may be preferable. A planned soffit or dropped ceiling can provide space for ducts without cutting major structural members. Closets and other suitable service areas may also accommodate dedicated vertical chases.
A basement or attic distribution arrangement can sometimes reduce the need for long concealed wall ducts. However, the branches must still reach the intended rooms through appropriately sized connections. In some older homes, a ductless heating and cooling system may avoid major wall construction altogether.
The best alternative depends on the home's existing structure and the required heating and cooling capacity. The contractor should compare practical routes before beginning demolition.
What Mistakes Should You Avoid?
Wall duct installations can create structural, airflow, and fire-safety problems when poorly planned. The following mistakes are particularly important to avoid:
- Cutting load-bearing studs without approved structural guidance.
- Choosing duct size solely from the available cavity width.
- Using ordinary wall cavities as supply-air plenums.
- Ignoring code restrictions on return-air cavities.
- Routing ducts through concealed electrical or plumbing components.
- Installing compressed flexible ducts inside narrow walls.
- Failing to provide appropriate supports for vertical ducts.
- Leaving joints unsealed before closing the wall.
- Omitting required insulation or air-barrier restoration.
- Disturbing suspected asbestos-containing materials.
- Failing to follow applicable lead-safe renovation requirements.
- Leaving required fireblocking incomplete.
- Using ordinary sealant where an approved fire-rated system is required.
- Installing a restrictive supply or return grille.
- Closing walls before leakage and airflow checks.
- Concealing dampers or other components that require maintenance access.
The safest and most effective installation begins with an approved route and correct duct dimensions. Building finishes should only be restored after the duct and surrounding construction have been inspected.
When Should You Hire an HVAC Contractor?
Professional installation is recommended whenever new ductwork passes through structural framing or several floors. The project requires an understanding of airflow design and how the duct can be accommodated safely within the building. Building permits and appropriate trade coordination may also be necessary.
An HVAC contractor can determine the required duct dimensions and connection locations. Structural modifications should be reviewed by qualified construction professionals where required. Electrical relocation and hazardous-material work must be handled by personnel with suitable qualifications.
Before approving the project, ask for a layout showing the duct route, affected walls, and planned restoration. The proposal should also identify how leakage and airflow will be checked after installation.
Conclusion
Running ductwork through walls requires careful coordination between HVAC design and building construction. Dedicated, properly sized ducts or approved chases are generally preferable to relying on unsealed framing cavities. Structural members, electrical wiring, plumbing, insulation, and fireblocking must all be considered before openings are made. Duct connections should be mechanically secured, sealed, supported, and tested before the wall is closed. Have a qualified contractor review the proposed route so the installation provides suitable airflow without damaging the building.